 |
| Gluten-Free Pizza Pretzels |
The idea for this blog post started when my 5-year-old son didn't have school one day, so I asked him what he would like to do. He said to me, "Can we go to the really big store with a restaurant where they have pencils?" "Pencils?" I asked, not understanding what he meant. "Yeah, mommy, pencils with cheese sauce!"
It took me awhile to stop laughing, because I realized what he meant. He wanted to go to Target for the pretzels! Still laughing, I said sure. We made it a big deal - we waited until daddy could come too, and little brother was up from nap time, and we all headed to Target as a family for pretzels with cheese sauce.
Unfortunately though, Target stopped serving cheese sauce. They only offered marinara sauce with the pretzels. Unsure of how I would explain this to my son so as to not disappoint him, out of my mouth came the answer. "Hey look, they gave us pizza sauce. We're having pizza pretzels!"
This was a dream come true for my son, who absolutely loves pizza. Our family date to the Target food court was a success. And the idea was born for this blog post. I thought to myself, pizza pretzels sound delicious. I could add pepperoni and cheese to the dough, serve with marinara sauce. But the only problem was I knew I would pig out on them! All of that white flour! So I decided to experiment with gluten-free soft pretzels, for a slightly less guilty version. The experiment was a huge success. Even my husband loved these pizza pretzels, saying "these do NOT taste gluten free."
Enjoy this recipe! These were a ton of fun to make. They are best served hot out of the oven, but try to avoid eating them all at once! I had trouble with that part.
 |
| Gluten-Free Pizza Pretzels |
Recipe (adapted from this
recipe):Ingredients:
2 cups white rice flour
1 cup brown rice flour
3/4 cup tapioca flour
1 tsp. xanthum gum
1/2 tsp. baking powder
1 tsp. salt
2 tsp. Italian or pizza seasoning
2 tsp. garlic powder
1 cup warm water
2-1/4 tsp. instant yeast
1 egg
3 tbsp. light corn syrup
2 tbsp. canola oil
1 cup shredded mozzarella cheese
1/2 cup diced Italian dry salami
1/2 cup diced pepperoni
1/2 cup finely shredded Parmesan or Romano cheese
 |
| Ingredients for Gluten-Free Pizza Pretzels |
For the water bath:
4 quarts boiling water
1/4 cup baking soda
2 tbsp. sugar
Marinara sauce for dipping (and ranch dressing if desired)
Directions:
In a measuring cup or bowl, mix the yeast with the warm water and set aside. In the bowl of a stand mixer, whisk together the dry ingredients. Add the egg, corn syrup, and oil. After the yeast has proofed for 3 minutes, add the water-yeast mixture and mix, using the dough hook.
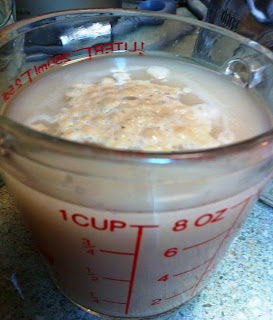 |
| Proofed Yeast |
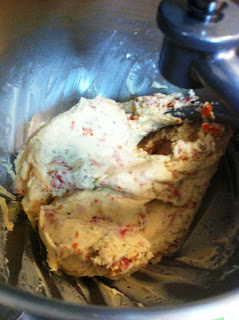
When all ingredients are combined, add the mozzarella cheese, salami and pepperoni.
 |
| Mixing all ingredients together |
Mix on medium-high speed for about 4 minutes (if you don't have a stand mixer, you can use a hand mixer to mix the dough, and knead by hand for 4 to 5 minutes).
 |
| Smooth Dough after Kneading |
When the dough is smooth, place on a lightly white-rice floured surface, and knead into a ball. Place the ball into a large mixing bowl rubbed down with olive oil. Cover with a damp warm towel, and let rise for about 90 minutes or until doubled in size.
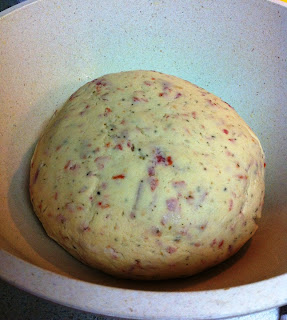 |
| Dough after Rising |
When the dough has risen, preheat the oven to 425 degrees. Prepare your water bath by bringing 4 quarts of water to a rolling boil, adding the baking soda and sugar, and stirring to combine. On a lightly white rice floured surface, separate the dough into 12 equal pieces. As you work with each individual piece, keep the rest of the dough covered with your towel. Roll each piece into a 12-14" rope.
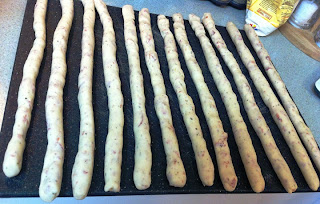 |
| Dough Rolled into 12 Ropes |
Place parchment paper on two baking sheets. Shape each rope into a "U", then twist the ends around each other, and fold over to the bottom of the "U" (see photos).
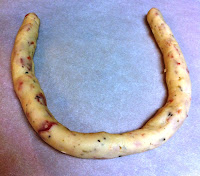 |
| Shaping Rope into a "U" |
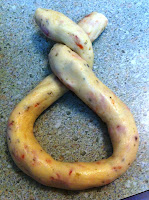 |
| Twisting ends around each other |
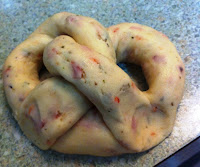 |
| Folding ends over to bottom of pretzel |
Press the ends into the dough to secure. When all the pretzels are shaped, one at a time, place into the boiling water for about 5 seconds, or until the pretzel rises from the bottom to the top of the water.
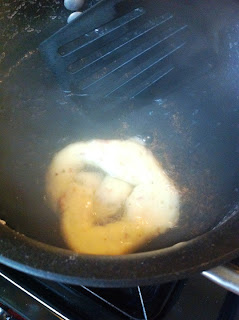 |
| Pretzel Rising to the Top of the Boiling Water |
Using a large slotted spoon or spatula, remove from the boiling water and place back on the baking sheets. Sprinkle the Parmesan or Romano cheese over the pretzels.
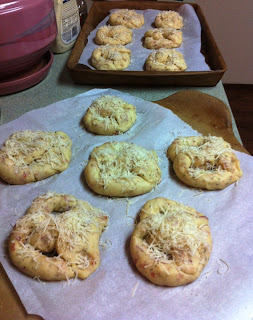 |
| Pretzels before Baking |
Place one of the baking sheets on the lower rack and the other baking sheet on the upper rack. Bake for 12 minutes. When the timer goes off, rotate the baking sheets and bake for another 12 minutes, or until golden brown.
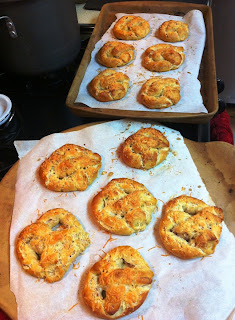 |
| Pretzels after Baking |
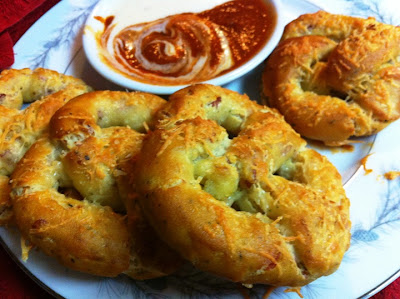
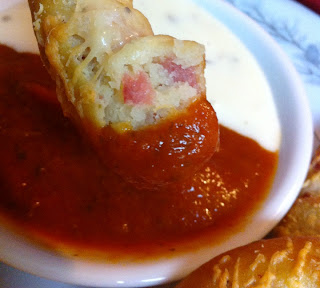
These are so good right out of the oven served with marinara sauce. I also have a ranch dressing addiction, so I served my pretzels with both sauces. My family went crazy for these pizza pretzels! Enjoy!
 |
| Gluten-Free Pizza Pretzels with Marinara Sauce |
Recipe (without photos):
Adapted from this
recipe
Ingredients:
2 cups white rice flour
1 cup brown rice flour
3/4 cup tapioca flour
1 tsp. xanthum gum
1/2 tsp. baking powder
1 tsp. salt
2 tsp. Italian or pizza seasoning
2 tsp. garlic powder
1 cup warm water
2-1/4 tsp. instant yeast
1 egg
3 tbsp. light corn syrup
2 tbsp. canola oil
1 cup shredded mozzarella cheese
1/2 cup diced Italian dry salami
1/2 cup diced pepperoni
1/2 cup finely shredded Parmesan or Romano cheese
For the water bath:
4 quarts boiling water
1/4 cup baking soda
2 tbsp. sugar
Marinara sauce for dipping (and ranch dressing if desired)
Directions:
In
a measuring cup or bowl, mix the yeast with the warm water and set
aside. In the bowl of a stand mixer, whisk together the dry ingredients.
Add the egg, corn syrup, and oil. After the yeast has proofed for 3
minutes, add the water-yeast mixture and mix, using the dough hook. When
all ingredients are combined, add the mozzarella cheese, salami and
pepperoni. Mix on medium-high speed for about 4 minutes (if you don't
have a stand mixer, you can use a hand mixer to mix the dough, and knead
by hand for 4 to 5 minutes).
When the dough is smooth,
place on a lightly white-rice floured surface, and knead into a ball.
Place the ball into a large mixing bowl rubbed down with olive oil.
Cover with a damp warm towel, and let rise for about 90 minutes or until
doubled in size.
When the dough has risen, preheat the
oven to 425 degrees. Prepare your water bath by bringing 4 quarts of
water to a rolling boil, adding the baking soda and sugar, and stirring
to combine. On a lightly white rice floured surface, separate the dough
into 12 equal pieces. As you work with each individual piece, keep the
rest of the dough covered with your towel. Roll each piece into a 12-14"
rope.
Place parchment paper on two baking sheets.
Shape each rope into a "U", then twist the ends around each other, and
fold over to the bottom of the "U" (see photos). Press the ends into the
dough to secure. When all the pretzels are shaped, one at a time, place
into the boiling water for about 5 seconds, or until the pretzel rises
from the bottom to the top of the water. Using a large slotted spoon or
spatula, remove from the boiling water and place back on the baking
sheets.
Sprinkle the Parmesan or Romano cheese over the
pretzels. Place one of the baking sheets on the lower rack and the
other baking sheet on the upper rack. Bake for 12 minutes. When the
timer goes off, rotate the baking sheets and bake for another 12
minutes, or until golden brown.
These are so good right
out of the oven served with marinara sauce. I also have a ranch
dressing addiction, so I served my pretzels with both sauces. My family
went crazy for these pizza pretzels! Enjoy!